Guides
The five-clip shot list: film a story on your phone
Only an idea and no footage yet? Film five ten-second clips on your phone: the opening, the person, the thing, the detail and the close. Then turn them into a video.
· 8 min read
ReelBolt 0.3.1-alpha — public alpha. Expect rough edges; things may change. Tell us what’s wrong
We collect telemetry to see how the alpha is going. We also record product-health signals (a failed tool call, a refused request, a failed workflow step, or a chat that ended on an error) as metadata only, so we can see when the alpha is struggling. Each is linked to your account and workspace, and so to your email address; it is not anonymous. It carries no message content. Privacy policy
Guides
Sign up, answer two questions, drop in your clips, say what the video is for and press Run. What to expect from a first ReelBolt video, limits included.
Published · 9 min read
You filmed the clips. What stands between them and a video you can post is usually a blank timeline and an evening you do not have.
This guide walks the whole path to a first video in ReelBolt, in the order the app takes you through it: create an account, answer two questions, drop in your clips, say what the video is for, press Run, watch the first cut, change something, download it. It also says plainly what the free trial gives you, what to do when a run fails, and what ReelBolt does not do yet.
Sign up with your name, your email and a password, or with a Google or GitHub account where the sign-up page offers one. No card is asked for.
If you sign up with email, ReelBolt sends you one confirmation link. Open it and you are signed in. Runs that use credits stay switched off until your address is confirmed, so do this first. It can take a minute to arrive. If nothing does, check your spam folder and use Resend email.
If your ReelBolt is run by your own administrator, they create your account and the first screens can differ. Getting started covers that case.
The first screen after sign-in asks two things. Each is one click.
Choose Clips I already shot and ReelBolt creates a project called My first video, puts the Highlight edit from footage recipe in it, and opens it on the place where your clips go. You do not pick from a gallery, and the product tour does not start by itself. It stays in the Help menu for later.
The other two answers work like this. Just an idea so far gives you a list of five short clips to film on your phone, about ten seconds each, written for the kind of video you chose. You film them and add them the same way. It does not generate a video from the idea. An app or website I built starts your project with a different recipe, which makes a promo video from the app’s source code. The promo from your code page covers that path.
Drag your clips anywhere onto the project page, or press Upload files. When the upload finishes they are listed on the Files tab under Sources.
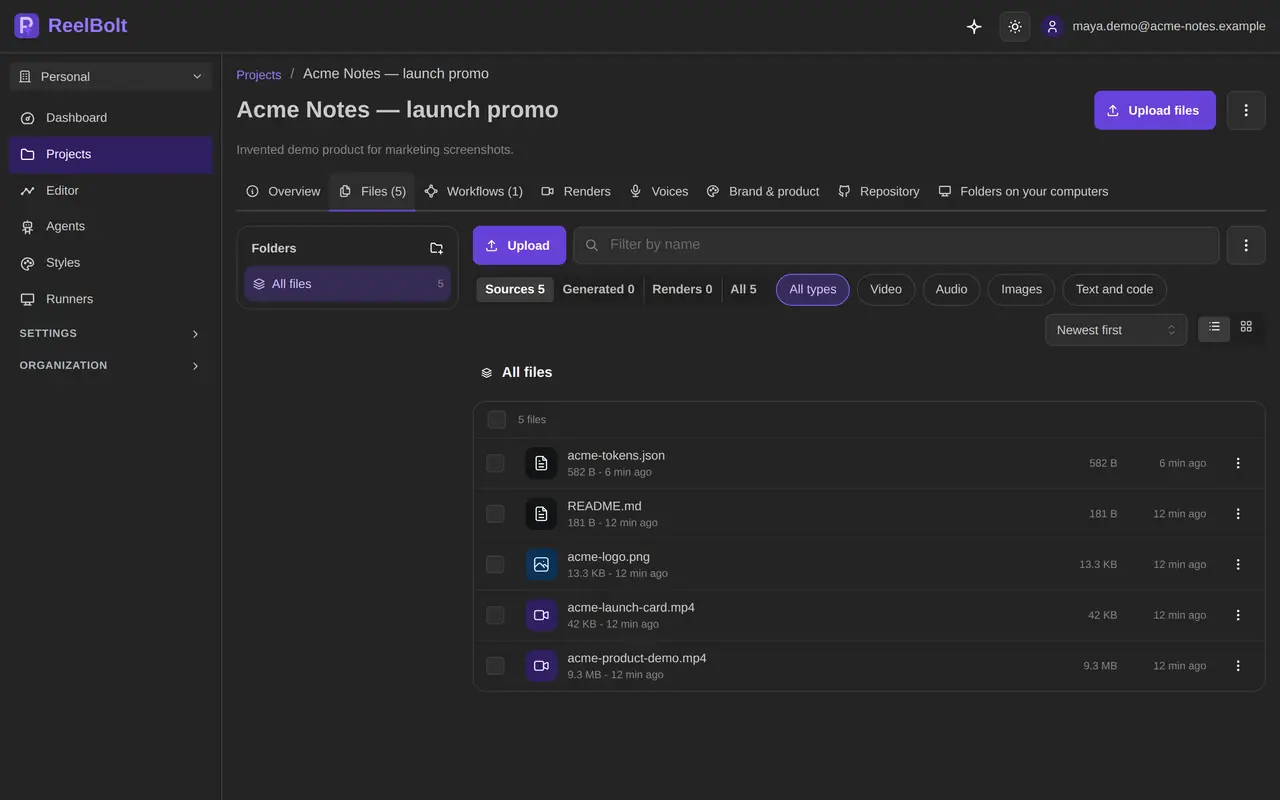
The highlight edit works on 1 to 20 clips. The trial plan includes a small storage allowance, which the pricing page lists, so a handful of short clips is the right size for a first video.
What you film matters more than how much. Several different shots give the editor something to choose between and to cut together. One long take can only be trimmed.
Open the recipe from the project’s Apps tab, or follow the Your first video panel on the dashboard, which links straight to it. The page asks for a few things:
The notes are the part worth a minute of thought. The dashboard shows an example for the kind of video you chose, such as “The best moments of this trip, for my followers” or “Our new autumn menu, for people who live nearby”. If something must stay in, say so here. When the notes disagree with a setting, the setting wins.
The page also has a style, which sets the pace and the mood, and a Captions switch, which is off by default. Switch it on to show the words spoken in your clips on screen. There is no narration setting and no music library. The highlight edit uses the sound of your own clips.
A green Ready line says everything the recipe needs is in place. If something is missing, such as a clip you have not picked, the line names it. The Run button shows the credits the run is expected to use. Check the figure, then press it.
Four things then happen, in this order:
How long it takes: minutes for a small job, sometimes half an hour for a big one. Longer clips take longer to go through. You can leave the page. The run carries on, and the dashboard shows it under runs in progress.
When the status reads Finished, the video is on the project’s Renders tab, marked Final. A round the reviewer sent back leaves a Draft next to it. Press play on the final one.
A yellow box at the top of the run page, or under the player, means something did not turn out as asked, for example a video much shorter than the length you set. Read it before you share anything.
The blank timeline was the hard part. A first cut you can react to is the easy part, and reacting is the next step.
You stay in charge of the cut. There are two ways to change it.
Change a setting and make it again. On the recipe’s page, a finished video offers Change one thing and re-run. The dialog shows the settings this run used, such as the length, your notes and the captions switch. Change the ones you want. It lists which parts are made again and the credits that will cost, and the parts a change does not touch are kept from the first run for free. The result is a new run. Your first video is kept. The shape, the resolution and the style cannot be changed there, so for those you run the recipe again.
Open the cut in the editor. The editor shows the edit as a timeline, where you can trim, reorder and add text. It is labeled Early preview, and some tools in it are still being finished. The editor changes the edit, not the finished file, so to get a new video you render it from the editor’s export screen.

One thing to know before you look for it: the box where you type a change in plain words and get a new version works on animated videos, such as a promo made from code. It does not work on a footage edit. See Request changes for what can be changed where.
On the Renders tab, press Download to save the file. A new video can show Checking your video for a moment first. It appears by itself when the check is done.
Share opens your device’s share sheet or copies a link, but that link only opens for people signed in to your project. To send the video to someone else, download it and send the file.
A trial workspace starts with 100 one-time credits. When you verify your email, your account also receives a one-time grant of 750 credits, so your first video is on us. The grant expires 30 days after it is granted and is given once per person. Your dashboard shows how many of those credits are left and the date to use them by. If the grant is not available for your account, the dashboard says so, and the trial credits still apply.
Trial exports are 720p with a watermark. Paid plans export without the watermark and at higher resolutions. The pricing page lists what each plan includes.
Runs fail sometimes. The run page shows Failed and which step stopped. What happens to the credits depends on why:
Resume carries on from the step that did not finish. Steps that already finished are not run again and not charged again. Run again starts over from the first step. If you cannot tell why a run failed, open the assistant and ask “Why did my last run fail?”.
Two problems are common on a first edit, and both have a fix:
The highlight edit recipe page has the details of what is removed and what to check after a run, and Run settings explains each setting on the page. When the first video is done, Choose a recipe lists what else you can make, such as subtitles for the finished video or a cover picture.
No card is required. A trial workspace starts with 100 one-time credits, and when you verify your email your account receives a one-time grant of 750 credits for the first video. The grant expires 30 days after it is granted and is given once per person.
Minutes for a small job, sometimes half an hour for a big one. Longer clips take longer to go through. You can leave the page while the run works, and the dashboard shows it under runs in progress.
Not on the free trial. There is no trial recipe that turns only a prompt or only photos into a video. If you start from an idea, ReelBolt gives you a list of five short clips to film on your phone, and the edit is made from those.
Trial exports are 720p with a watermark. Paid plans export without the watermark and at higher resolutions. The pricing page lists what each plan includes.
If a step fails because of a problem on our side, the credits held for it are refunded. If it fails because of the input, such as a file that cannot be read, or because you stopped it, the credits it actually used are kept. Resume carries on from the step that did not finish without charging again for the steps already done.
No. Pick vertical, square, landscape or portrait before you press Run. A finished video cannot be re-cut to another shape yet, so a second shape means running the recipe again.
See it on your footage
Drop in your clips and say what the video is for. An AI video team makes the first cut, you change what you want, and every paid step shows its estimate first.
Guides
Only an idea and no footage yet? Film five ten-second clips on your phone: the opening, the person, the thing, the detail and the close. Then turn them into a video.
· 8 min read
Guides
For coaches, teachers and course makers: cut a recorded lesson into short captioned clips, add translated subtitles or a dub, and know the limits before you start.
· 13 min read
Guides
Drop in the clips from your week, say what the video is, and get a reviewed first cut. Then add subtitles, shapes, a cover and post text. Limits included.
· 10 min read