Guides
Your first video in one sitting: from raw clips to a finished cut
Sign up, answer two questions, drop in your clips, say what the video is for and press Run. What to expect from a first ReelBolt video, limits included.
· 9 min read
ReelBolt 0.3.1-alpha — public alpha. Expect rough edges; things may change. Tell us what’s wrong
We collect telemetry to see how the alpha is going. We also record product-health signals (a failed tool call, a refused request, a failed workflow step, or a chat that ended on an error) as metadata only, so we can see when the alpha is struggling. Each is linked to your account and workspace, and so to your email address; it is not anonymous. It carries no message content. Privacy policy
Guides
Three videos a small business needs and the ReelBolt recipe for each: a shop video with titles, a narrated launch story and a testimonial reel. Limits included.
Published · 10 min read
You know the shop needs a video. So does the launch next month, and the offer you are running this week. You run a business. You did not start it to become a video editor.
This guide takes three videos a small business tends to need and matches each one to the ReelBolt recipe that makes it. It also covers setting up your brand from a PDF, picking the shape for each channel, and making the cover picture and the post text. We make ReelBolt, so read it with that in mind. The limits are in here too, and so is what needs a paid plan.
Before: a camera roll full of clips, a blank timeline, and a weekend gone before anything is ready to post.
After: a finished cut with the dead air gone, your words on screen, in the shape the channel wants. You watch it, ask for changes, and post it.
We are not going to put a number on that difference. We have no customer results to quote yet, and we will not invent a time saving. What we can say is how long a run takes: minutes for a small job, sometimes half an hour for a big one. You can leave the page while it works.
A recipe is a ready-made app for one kind of video. In a project, choose Start from a recipe and pick the one you want. Its page asks for a few things: your clips, a length, a shape and a box for notes. A Ready line says whether everything the recipe needs is in place, and names what is missing if not. The Run button shows the credits the run is expected to use, so you see the figure before you spend anything.

Each of the three recipes below ends with a review. The draft is scored before you see it, and a low score sends it back for another pass, for up to three rounds.
If you have never made a video in ReelBolt, read Your first video in one sitting first. When you start from clips, your first project comes with the plain highlight edit. The three recipes here are the next step.
The recipe: Footage edit with titles and callouts.
What you film. Several different shots. The front of the shop, the counter, hands doing the work, and you saying one sentence to the camera. Several shots give the editor something to cut together. One long take can only be trimmed.
What you get. Your clips cut down to the good parts, with the dead air, the false starts and the retakes left out. On top of the cut, ReelBolt adds on-screen text: a title, a name tag when someone is introduced, a callout for a key point. The graphics are placed where the picture has room, away from faces, at moments that match what is being said.
What to write in the notes. The exact words you want on screen, and where. For example: “A title with the shop’s name at the start. A name tag when I introduce myself. One callout with our opening hours near the end.” The designer is told to prefer no graphics over a cluttered picture, so name the ones you want.
Good to know. This recipe takes longer than a plain edit, because each graphic is designed and rendered on its own. Ask for a few, not a dozen. When a graphic cannot be made as an animation, it falls back to plain text on a see-through box. A Captions switch, off by default, also puts the words spoken in your clips on screen. Read every word on screen before you post. The details are on the titles and callouts page of the guide.
The recipe: Narrated product story. The name says product, but the product can be a new menu, a class or a service. What it needs is clips and a brief.
What you film. Short clips of the thing you are launching, from a few angles. Clips with no sound of their own are fine, because the narration carries the story. Nobody has to talk to the camera.
What you get. This recipe writes the story first and then cuts your clips to it. A writer reads your brief and what was seen in each clip, and writes a short script with a beginning, a middle and an end. Each line is tied to the clip it should play over. The clips are put in the script’s order, the narration is spoken by a stock AI voice, and captions that follow the narration are burned into the picture.
What to write in the brief. What the video is about, who it is for, the tone, and how long it should be. For example: “Our new autumn menu, for people who live nearby. Warm and plain. About 30 seconds.” The writer is told to say only what your brief and your footage support, with no made-up names, prices or numbers. So if a date or an offer must be said out loud, put it in the brief.
Good to know. When the review sends a draft back, the story is rewritten as well as the cut. A cloned voice of a real person is possible only after that person’s consent is recorded in ReelBolt. Listen to the whole narration before you post, the way you would proofread a flyer. The guide has more on the narrated story and on voiceovers and captions.
The recipe: Testimonial reel from a talking-head clip and a screenshot.
What you bring. A clip of one person talking to the camera: you, or a customer who agreed to be filmed. And a screenshot, such as a written review, a message or a price table. Put the clip in Your clips and the screenshot in A picture or video to show, which takes up to four files.
What you get. The clip cut down, with the screenshot shown at a calm moment the editor chooses. Something the viewer has to read is shown full screen, long enough to be read, and it is fitted whole. A tall phone screenshot keeps its shape, with bars at the sides. Something like a logo sits in a corner while the speaker stays visible.
What to write in the notes. What the clip is about and when the screenshot should appear. For example: “Show the review when she talks about the delivery.” With the setting Under a full-screen picture you can keep the speaker talking under the screenshot, fade the sound out for it, or leave the choice to the editor.
Good to know. When the run finishes, a section called Pictures over the film lists what was shown and when. Anything offered but not used is listed under Not shown with the reason. ReelBolt shows the screenshot as a picture. It does not read or check the words in it. Show only real reviews, and ask the person before you use their words, name or face. See Show a picture or video over the film.
You stay in charge. On the recipe’s page, a finished video offers Change one thing and re-run. Change the notes or a setting, see which parts are made again and what that costs, and get a new version. The first one is kept. You can also open the cut in the editor and trim or reorder it yourself. The editor is labeled Early preview, and some tools in it are still being finished.
If you have a brand or style guide as a PDF, open the project’s Brand & product tab and import it. ReelBolt reads the text of the guide and pulls out the colors and the typography it describes. The file can be up to 20 MB, and it needs real text in it. A PDF with no text cannot be read.
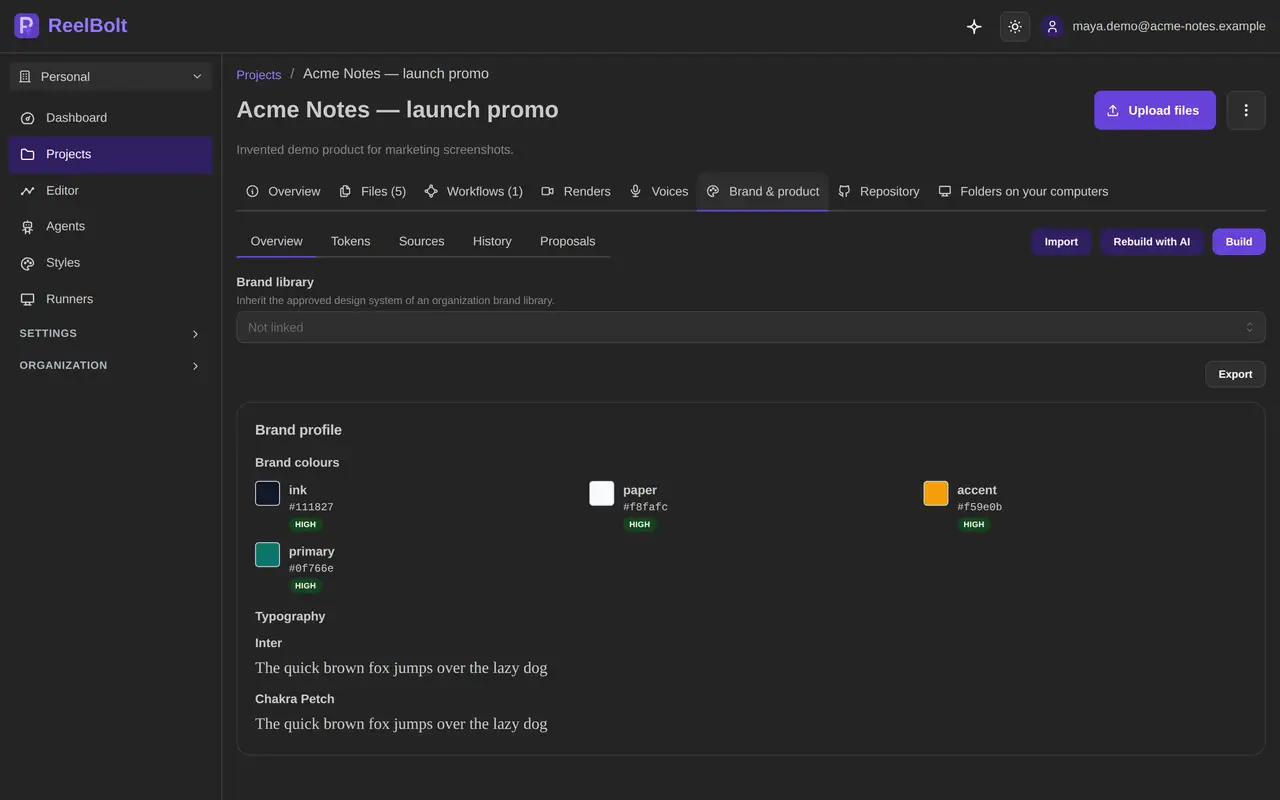
The result is saved as a draft. Nothing uses a draft until you approve it, so check the colors and fonts first and correct what is wrong. Importing and approving are free. A separate build step can fill gaps with an AI model. That part uses credits, and it shows you an estimate before it starts.
No PDF? A design export works too: a zip saved from a design tool, a CSS file with your colors and fonts, or a design token file. The Brand and product profile page lists every format.
Once a brand is approved, ReelBolt uses it when it designs on-screen graphics, such as the titles and callouts in job 1. The run page shows which brand version a video used. The brand guides the graphics. It does not write your narration, so put the tone you want in the brief. Check the first video against your guide the way you would check a print proof.
Every recipe here makes one of four shapes:
Platforms change what they accept, so check each one before you choose. On a vertical video, captions are kept out of the bottom and the top of the frame, where those apps draw their own buttons and text.
The limit to plan around: you choose the shape before the run, and a finished video cannot be re-cut to another shape yet. A second shape means running the recipe again, which uses credits again. Decide where the video is going first, and make that shape first.
A video still needs a cover and something to say next to it. Both are short jobs.
Thumbnail and cover text is a recipe. It takes a frame from a video in your project, either the one it judges best or a time you choose, and puts an optional title on it, up to 90 characters. It uses very few credits. The picture is saved in the project. The thumbnail page has the details.
Write post text is on a finished video. Pick where you will post: TikTok, Instagram Reels, YouTube Shorts, LinkedIn or X. You get one version per platform, cut to the length each one allows, with a title where the platform has one, the body and hashtags. It writes from the text ReelBolt already holds, such as your brief and the narration. An option called Also read the video adds the spoken words and a few still frames, and costs more credits. The price shows before anything is written.
Post text uses a small amount of credits. ReelBolt does not post for you, and the hashtags are suggestions, not measured trends. See Post text for a finished video.
All three recipes, the brand import, the thumbnail and the post text work on the free trial. No card is required. A trial workspace starts with 100 one-time credits. When you verify your email, your account also receives a one-time grant of 750 credits for a first video, which expires 30 days after it is granted. If a step fails on our side, the credits held for it are refunded.
Trial exports are 720p with a watermark. That is enough to judge the result. A video you put in front of customers will probably want the watermark gone, and that needs a paid plan. Here is what sits behind one:
The pricing page lists what each plan includes and what it costs.
Pick the one video you need most this month. Film five short clips for it on your phone, each a different shot. Create an account, add the clips to a project, choose the recipe from Start from a recipe, and write two sentences about who the video is for and what it should show. Then press Run and judge the result for yourself.
If the video you want is not one of these three, Choose a recipe matches what you want to make to the recipe that makes it, and keeps its own list of what is not possible yet.
No. You add the clips you shot, pick a recipe, say what the video is for and press Run. An AI editor makes the first cut and a reviewer scores it before you see it. An editor is there if you want to change something yourself. It is labeled Early preview.
Not on the free trial. No trial recipe turns only photos or only a prompt into a video. The recipes in this guide start from clips you filmed. AI-generated clips are part of the Pro plan and the plans above it.
If you import your brand guide and approve the result, ReelBolt uses that brand when it designs on-screen graphics such as titles and callouts. The import is saved as a draft and nothing uses it until you approve it. Check the first video against your guide.
You choose one shape before each run: vertical, square, landscape or portrait. A finished video cannot be re-cut to another shape yet, so a second shape means running the recipe again, which uses credits again.
No card is required. A trial workspace starts with 100 one-time credits, and when you verify your email your account receives a one-time grant of 750 credits for a first video, which expires 30 days after it is granted. Trial exports are 720p with a watermark. Exports without the watermark start on the Creator plan.
No. A screenshot is shown as a picture. ReelBolt does not read or check the words in it, so it is up to you to show only real reviews and to ask the person before you use their words, name or face.
See it on your footage
Drop in your clips and say what the video is for. An AI video team makes the first cut, you change what you want, and every paid step shows its estimate first.
Guides
Sign up, answer two questions, drop in your clips, say what the video is for and press Run. What to expect from a first ReelBolt video, limits included.
· 9 min read
Guides
Only an idea and no footage yet? Film five ten-second clips on your phone: the opening, the person, the thing, the detail and the close. Then turn them into a video.
· 8 min read
Guides
For coaches, teachers and course makers: cut a recorded lesson into short captioned clips, add translated subtitles or a dub, and know the limits before you start.
· 13 min read